Wednesday, 23 December 2020

Snowman and Robin

It's almost Christmas day and despite all the awfulness of this past year, I'm looking forward to it. Hopefully I'll never grow up!!

I did do a little sewing this year for Christmas and some lino printing, too. This is my second attempt at the "Let it Snow" Snowman.

I enjoyed making the first one so much and was so pleased with the result, that I wanted to do another straightaway, but this time using the sewing machine to do the applique.

This is my first Snowman with the applique sewn by hand

and side by side to compare.

Can you see the difference in his face? I have changed the shape of the carrot nose by adding a curve at the base, and then given him some eyes - I like him so much more.

This is a link to a printer friendly line drawing in case you'd like to make your own Snowman. It has the original carrot nose and no eyes. - Let it Snowman  .He'd look lovely in Redwork.

As usual I lino printed some of my Christmas cards. I love the process and Christmas gives me the excuse to have a go. This year I printed a robin in 2 colours. They look so jolly all lined up on the kitchen table as they dry.

This pic shows the first printing and the finished robin.

I also printed a robin on some fabric and this one is on some soft packaging which feels like a cross between paper and fabric. I added a fabric breast (a bit too dark) and stitching, then went a bit OTT with the borders!

Another year fast approaches and let's hope for better times for everyone - Anita xx

Tuesday, 17 November 2020

Book of Flowers

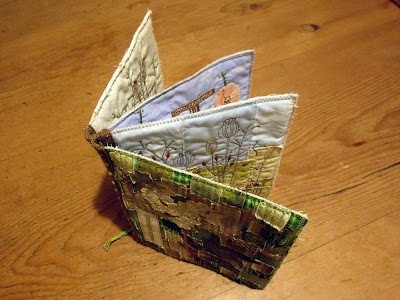
 I'm forever trying out new to me things in sewing and I end up with lots of "experiments" which I want to keep, if only for future reference. I decided to turn some of them into a book - a bit like a sketchbook.


One of our challenges at Flowerpatch Quilters this past year has been called "Meadowsweet" so this is my cover.


Inside we have some machine embroidered seed heads


A couple of stitchings over a lino print of the amazing hollyhocks I had growing by my bird table in the summer


A lake scene with yellow flags in the foreground and more seed heads


Finally this is the back which was a fun picture of my back garden that I sewed after getting a new sewing machine - I had so many different stitches to try out!


Every time I make a book I seem to find a different method to put it together. This time I sewed  two of my individual pictures back to back, zig zagging around the edges. This made 4 pages with a design on both sides. Then I sewed two pages next to each other sewing on some tape, front and back, to make a hinge. The same for the other two pages so that I now had two signatures. Finally I stitched through the hinges to join the signatures.


Notice how I have sewn to the side of the centre line so that my book closes easily and the pages meet nicely at the edge. Amazingly it worked a treat and was simple to do.


These are the links to the two other fabric books that I have made:

Love to Stitch book

Seasons Book

Happy Stitching - Anita x


Wednesday, 11 November 2020

Fabric boxes and Invisible zip

I am loving making these simple fabric boxes


 - so much so that I have to tell you about the super tutorial on Tina Craig's "Seaside Stitches" blog. It's written so well. This is the link: Fabric Box Tutorial . I'm sure you'll want to make some too!


I made all mine starting with an 8" square and I sewed the corner triangles at 1.5". They measure 3" x 3" x 2.5" high. This one is linen with wood slice buttons.


Another thing that I have been reading about online is how to put an invisible zip into a cushion and I really wanted to have a go. I already had one side of a cushion cover made. It's a little strange as it was mostly made from some leftover blocks of a quilt, which I cut up and sewed back together again. That's why it was put to one side for some months. By using an invisible zip closure both sides of the cushion can be the front - if you see what I mean, so I set about making another side for my cushion cover.

This is my finished cushion showing the side that I made most recently. I sewed the circle blocks by reverse machine applique using the freezer paper method.


and, do you really want to see the other side? Well here goes


I think the best bit about my cushion is the amazingly good job I made of putting the zip in - it being my first attempt. :)


I followed the brilliant tutorial on Sew Katy Did and followed Katy's advice to go back and re sew closer to the zip teeth. This is the link to the tutorial - Invisible zip

There's always something new to try in sewing - Anita x

Monday, 5 October 2020

Home

Many months ago I couldn't resist buying a half price bargain from a local store. It was an mdf picture frame with the word "Home" in relief and I knew just what I would do with it. Well finally, after kicking around in my sewing room and getting ever shabbier and shabbier, I have turned it into this picture to hang on my kitchen wall.

I painted the frame in acrylics using stencil brushes and a tiny sponge. 

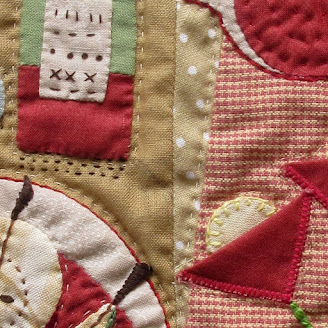
The houses are embroidered applique and quilted, then machine blanket stitch around the edge to finish.


I stuck them to the mdf board with a little double sided tape.

I've been doing quite a lot of small applique and embroidery lately and this is an A4 picture I made for my son.

It is called "Living the Dream" and like his father he has a lot of sheds, which you can see in this earlier post!

Happy Stitching - Anita x


Friday, 18 September 2020

A Plethora of Circles

I have recently finished another small quilt featuring circles. This one is 30" x 38".


My circles are various sizes on different sized squares of calico which sit in the corners of my blocks. These have strips of fabric sewn onto two sizes of the appliqued square. I have rotated the blocks so that the circles run along the diagonals of the quilt.

Each red/orange circle has another smaller, cream coloured circle hand appliqued on it.

I have hand quilted around the circles in red, green and blue thread. The rest of the quilt is machine quilted with my even feed foot, in diagonal lines.

The backing fabric is green as is the narrow binding. You can see the quilting design better on the back of the quilt.

I've gone a bit circle mad just lately and have added small pale circles to another of my quilts to make it a bit more interesting - this is a before and after pic of my Strings and Circles Quilt

and sewn yet more small circles to my "Red Letter Life" quilt. Why? Well I was thinking about the happy bubbly feeling I get inside when I start a new quilting project and the fabric I used for the circles looks a bit like bubbles bursting!!!!!

Finally this is my evening sewing at the moment.

Luckily I have a settee all to myself and half of it (sometimes more) is covered in scraps of fabric, circle templates, embroidery threads and lots more sewing paraphernalia. I hate to be without sewing in the evening as I just fall asleep in front of the TV.


Not sure how many of these I will make or what I will do with them eventually!!

Happy stitching - Anita x

Wednesday, 12 August 2020

Still Life Shapes

I really thought that there would be loads of time to sew while we've been staying home more because of coronavirus. Not so - there is always something else to do and with quite a lot of lovely weather I've been enjoying making more effort in the garden this year.

I have managed to finish another small still life picture. This one measures roughly 10" x 13".

This time I tried to use just geometric shapes in the design so there are lots of circles (and part circles), triangles and rectangles.


The picture is divided into sections which I have emphasised by changing the fabrics where the sections meet.
So the table has two fabrics,

the sky has the same fabric but turned so that the subtle stripe goes the other way 

and the basket fabric is also turned through a right angle.

I have tried to make the various appliques also meet on these joins. For example the basket, the tip of a flower, the wine in the glasses and.the jug spout.
It's a quirky little thing and inspired by the lino prints of Jane Walker, as was my first still life.

Here's one last pic - 

Happy stitching - Anita x


Thursday, 4 June 2020

Journal Quilts - 2009

I was reminded recently of the Journal Quilts that I sewed - one each month for a year. On looking them out I was amazed to see that they were made in 2009 - how time flies. I thought it would be nice to travel down memory lane and write this blog post about them.

January shows trees that I saw on a walk on Davidstow Moor, with the shady side of each covered in wet, velvety moss. It snowed in February and then froze so that the snow on the wood stack changed to crispy ice.

In March we walked on Dartmoor and the water in the West Okement River seemed to be black. The Hazel coppice has a yellow carpet of celandines in April.

In May blackbirds built their nest in the wood stack and we visited the Fitzwilliam Museum while in Cambridge in June - this is the ceiling.

It's always lovely walking the southwest coast path and, in July, the buddleias are in bloom. August shows the "hot garden" at Rosemoor Gardens.

On a trip to Derbyshire in September we visited Arkwright's Masson Mills in Cromford. October I did some printing with leaves and did Kantha stitching inspired by Tricia Warman.

Finally a trip to family in Sussex inspired the Seven Sisters in November and December saw us laying waterpipe to our house across a neighbour's field. It was a very cold job!

I so wish now that I'd continued making journal quilts for other years.
Happy Stitching - Anita x

Sunday, 3 May 2020

Still Life - a different perspective

What a joy this little quilted wall hanging has been to make and I'm pleased with the result, too, a win-win! It measures approx 9" x 11" and is inspired by the brilliant lino prints of Jane Walker. I love the way she captures two different perspectives in one print.

I find that when I want to do a picture quilt it is much easier for me to draw it small - less intimidating than a large blank sheet of paper. Then I use my light box to make copies changing a few things as I go until I'm happy with the result. I scan this last copy into my computer as a Jpeg and then I can crop it in my photo editing. I insert it into my office draw program and make it the size that I want before printing it out. I can only print A4 size so if I want it larger I have to crop the scan into two, or more, so that I can print 2 A4 sheets, or more, and tape them together.

I trace my picture onto the reverse of some light coloured base fabric (and in reverse). I usually use calico, and I sometimes trace it onto the front as well if I think this will be helpful. For this picture the lines on the back were the more useful as I sewed much of it by needle turned applique.

Here are some close ups:

Apples and Pears

A Vase of Flowers

A Jug


And an extra pic to end

I loved doing this little quilt so much that another still life is in the planning stage.

Happy stitching - Anita x