Showing posts with label machine quilting. Show all posts

Monday, 30 January 2023

Birds

This past weekend it has been the RSPB Big Garden Birdwatch here in the UK and it's been a pleasure to have the excuse to peer out the windows and count the birds who come to the garden and the bird table. There have been lots and lots - I do love them so.

Just lately I've finished two quilted pictures which include birds. They were inspired by paintings that I saw on Pinterest which is a great source of ideas for me.


The first that I made is on the left and I tried to improve a few things, particularly the method of making, when I sewed the second. I didn't like the hand quilting of the first as I thought that it distracted from the applique. There is only one thing that I like more about the first picture! 

When I'm about to start a new project it's sometimes difficult to think just where to begin so I thought I would share my method with you. This is the method that I used for the second bird picture:

I drew my picture onto paper and transferred it, in reverse, onto sturdy calico, using a light box.

I sewed a raw edged background, in various blue rectangular fabric scraps, onto some pale blue striped fabric laid onto the undrawn side of the calico. I stitched these down by machine, sewing around the uncovered raw edges. I used the pale blue striped fabric underneath so that it didn't matter if there were gaps between my rectangles.

Next I sewed on the tree branches, placing brown fabric onto the blue background, and using my light box to get the positions of each one right. I sewed with a small straight stitch, from the back along the drawn lines on the calico. I trimmed each branch as close as I could to the stitches. I then used a machine blanket stitch to secure them, with light thread on one side of the branch and dark on the other. (This is what I don't like in the second bird picture and I'd rather that I'd used a zigzag stitch as I did in the first picture.)

I laid green fabric on the blue background in the position of a leaf, again using the light box to aid me. I sewed the leaf shape from the back of the picture by machine, with small straight stitches. I trimmed off the spare fabric close to the stitches and then used machine blanket stitch to secure.


After marking the position of the flowers and the birds on the front, I laid my work onto some wadding and free motion stitched between the leaves and branches.

I had already sewn the birds onto a thin piece of fabric with needle turned applique, and embroidered the wings, tail and breast. Now I could easily cut them out with a seam allowance of the thin fabric which I turned under as I sewed them into position. I embroidered a beak, legs and added a bead eye.
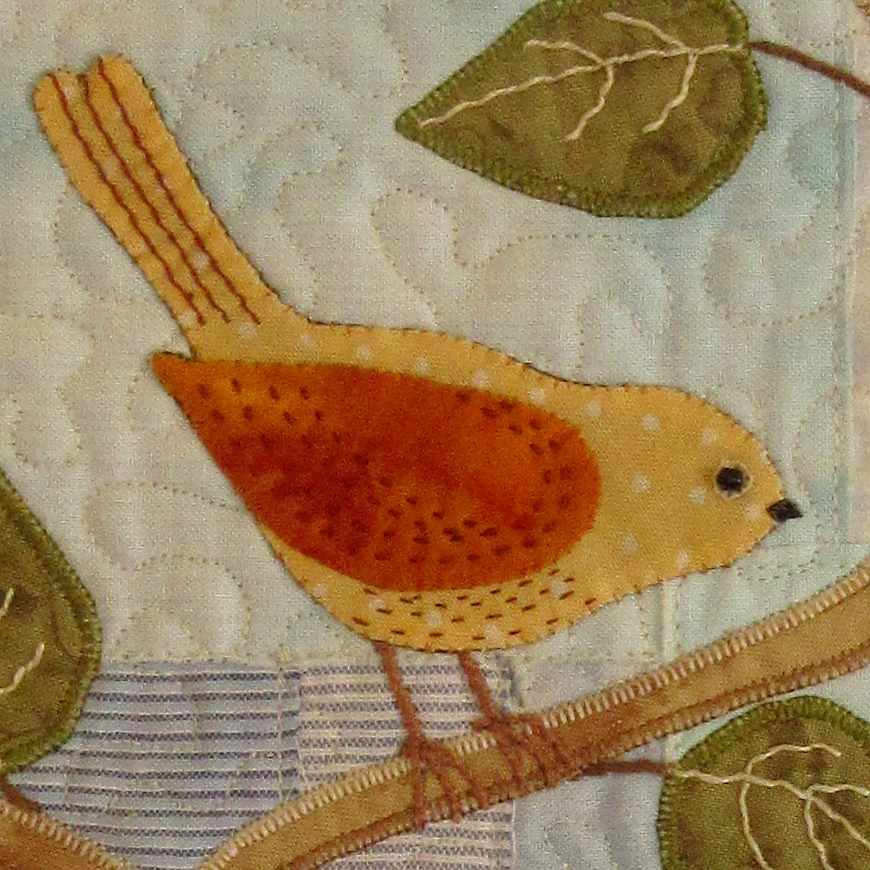

I embroidered the leaves and their stalks. For stalks I usually sew a small running stitch which I then whip with the same thread. I drew all the little flowers onto the backing paper of some Steam a Seam, laid this on the back of cream fabric, cut them out and ironed them down into position. I did a little stitch at the edge of each petal and tiny french knots in the centre of each flower, and sewed their stalks.


Just a backing fabric and binding left to do, with little triangles in the corners on the back to hold a hanging stick.


These are the close up pics from my first picture - leaves, a bird and berries.


For the berries I ironed stabilizer onto the back of red fabric and my husband punched out the circles with his hole punch! I sewed them in place with stitches radiating from the centre.

These two were lovely to do and they hang in my kitchen. They may yet be joined by another!

Happy stitching - Anita x


Thursday, 14 April 2022

Mystery to Me - finished

Well, it's been a long time in the making, but I've finally finished my Mystery to Me quilt. I think I must have started sewing this at the beginning of 2021 when we were in lockdown and I felt I needed a long term project to get my teeth into. I found piecing the blocks easy to keep on with as everyone is slightly different and it was always exciting to see how they would turn out. Things did slow down rather once I got to the machine quilting which was a tad boring as I didn't dare try anything clever in case I messed up, so it's all straight (straight-ish) lines.

I actually made up and quilted the quilt in nine sections. Each section contains more or less the same blocks but in different positions. I separated the nine sections with a row / column of 3" blocks. I thought I would sew these on after the quilting, but as I flunked to straight lines I ended up sewing these on before quilting. You may be able to pick out the two 3" wide rows and two columns in the pic above.

These are the 4 corner sections, where you can see the 3" wide strips on two of the sides.

Each section is a mirror image in the positioning of the blocks, or supposed to be - you might spot a mistake in the left bottom section!!

These two sections go either side of the middle.

Can you see that the position of the blocks is the same if you rotate one section through 180 degrees?

These go above and below the middle

Similarly, rotate one of these sections through 180 degrees and the blocks are in the same positions.

And finally this is the centre section


Well, with so many different blocks and fabrics I don't think I shall ever tire of looking at this quilt on my bed. Many of the fabrics are scraps left over from other projects, some being quilts made with friends, so it holds a lot of happy memories too.

Happy Stitching - Anita xx


Sunday, 24 January 2021

Slow Stitching Circles

I've had a lovely time stitching circles and half circles in the evenings as in my previous post. I didn't really want to stop! They are all raw edged, with lots of embroidery, and thicker threads couched down around the edges, etc. The most difficult bit has been deciding what to do with them - to display them nicely. I did wonder if a simple regimental positioning would be best ..... and I'm still wondering, but I settled on a sort of vase of flowers.


I started by pinning a few rectangles of cream fabric on some calico, backing it with wadding, and then quilting from top to bottom with wavy lines. I thought the applied fabric would make the background a little more interesting but they don't really show up much. I appliqued the circles onto the calico, sewed the stems, appliqued on the vase and then sewed the thin wiggly lines in brown. The stems are thick green cotton thread which is couched down, and the wiggly lines are whipped straight stitch.

Here are a few pics of the individual "flowers"

And the vase.


The half circles sewn to the top and bottom of the vase were originally intended as leaves, but they morphed!

This was a really enjoyable experience apart from all the decision making once the circles were sewn - sometimes you feel that you haven't got another decision in you! That's when sewing gets put to one side, and may never re-emerge! :)

Happy Stitching - Anita x


Friday, 18 September 2020

A Plethora of Circles

I have recently finished another small quilt featuring circles. This one is 30" x 38".


My circles are various sizes on different sized squares of calico which sit in the corners of my blocks. These have strips of fabric sewn onto two sizes of the appliqued square. I have rotated the blocks so that the circles run along the diagonals of the quilt.

Each red/orange circle has another smaller, cream coloured circle hand appliqued on it.

I have hand quilted around the circles in red, green and blue thread. The rest of the quilt is machine quilted with my even feed foot, in diagonal lines.

The backing fabric is green as is the narrow binding. You can see the quilting design better on the back of the quilt.

I've gone a bit circle mad just lately and have added small pale circles to another of my quilts to make it a bit more interesting - this is a before and after pic of my Strings and Circles Quilt

and sewn yet more small circles to my "Red Letter Life" quilt. Why? Well I was thinking about the happy bubbly feeling I get inside when I start a new quilting project and the fabric I used for the circles looks a bit like bubbles bursting!!!!!

Finally this is my evening sewing at the moment.

Luckily I have a settee all to myself and half of it (sometimes more) is covered in scraps of fabric, circle templates, embroidery threads and lots more sewing paraphernalia. I hate to be without sewing in the evening as I just fall asleep in front of the TV.


Not sure how many of these I will make or what I will do with them eventually!!

Happy stitching - Anita x

Saturday, 28 March 2020

Half-Square Triangles Mini Quilt Challenge

A mini blog post about a mini quilt challenge!
I have just finished making this mini quilt for the latest Curated Quilts Challenge.

It measures just over 10" square and the colours are those picked by the organisers specifically for the challenge. This is really what draws me to do these particular challenges as they are nearly always colours that I wouldn't have dreamt of putting together. I'm intrigued as to what they will look like and I try to use all the colours.

The challenge title is HST/Subtraction and I have called my quilt "Colour Loss".

I quilted it with grey thread in a randomly spaced grid and bound each edge in a different colour.

Stay safe and well - Anita x

Saturday, 15 February 2020

Questions and Cake at Flowerpatch

We had such fun at Flowerpatch Quilters last Thursday. The evening was titled "Questions and Cake" and there was plenty of both. Members had decided upon most of the questions at the previous meeting and anyone and everyone had an opinion on the answers so there was plenty of chat and laughter. To give you a taste these were some of the questions posed:

  • Do you wash your fabric before you begin? - Most said "no" except for fabrics that will shrink a lot like calico.
  • Do you follow a pattern or prefer to go your own way. - Most people seem to do a bit of each, even within the same quilt.
  • What sewing gadgets would you recommend? - Lots of ideas here.
  • Are pressing mats worth the expense? - The two people who have them think they're wonderful.
  • What do you use to mark quilting lines? - There didn't seem to be a definitive answer to this and everyone seemed to have problems, especially with dark fabrics.

Etc, etc - I'm sure you get the drift and it was a thoroughly informative evening.

The cakes made by the committee were delicious and much appreciated. We all decided that it was an evening worth repeating in the future.

This weekend has been yet another extremely wet and windy one as we're in the middle of storm "Dennis". I've not bothered to step outside the door today and have had a lovey time sewing. I find it hard to practise free motion stitching (feed dogs down on the sewing machine) - it can be a bit boring, so I decided to do a picture with free motion instead. I have been wanting to stitch seed heads and umbelliferae etc for some time and, not being much good at drawing, I have copied shapes from pictures on Pinterest. These have been taken from "Snapdragon" .

I'm hoping that now I have copied I shall be able to design more of my own little pictures ........ I think it's raining tomorrow, too! 😀 I'm thinking that the next one will have machine and hand sewing - this one is all done by machine. They will probably be used as pages in my next book.

Happy stitching - Anita x

Monday, 16 December 2019

Red Letter Life

My "Red Letter Life" quilt is completed ...... or is it?

This quilt was inspired by two things that happened in the summer. Firstly, Sophie of lunalovequilts blogged about her "Love" quilt. I love everything about this quilt, but especially the abstract lettering in the centre. Secondly, the theme in the upstairs room of our Flowerpatch Quilters exhibition was LOVE so I did my own abstract lettering to make a mini quilt 7½" square. I foundation pieced the letter squares then sewed them together.

By the by I also did another mini quilt for the exhibition using inktense pencils to draw the letters and added quilting and embroidery.

The quilting of Red Letter Life took quite a while. Its vertical wavy lines were sewn by machine with my walking (even feed ) foot. 

I avoided all the red letters and quilted these by hand with horizontal lines. I really like the effect of the two types and directions of the quilting.

From the beginning I planned to sew small circles on my quilt to represent the happy bubbly feeling I often get in my life ......... especially when I'm starting a new quilt! I scattered some buttons on the quilt and took a pic ......

......but they simply looked distracting, so I ended up just sewing on some red circles around the edge.

I think though that I may be tempted to add more little circles to my quilt - maybe very subtle ones - we shall see.

Red Letter Life measures 32½" square and I'm hoping that you've been able to read my abstracted words.

Happy Bubbles - Anita x
Thursday, 13 June 2019

Strings and Circles Quilt

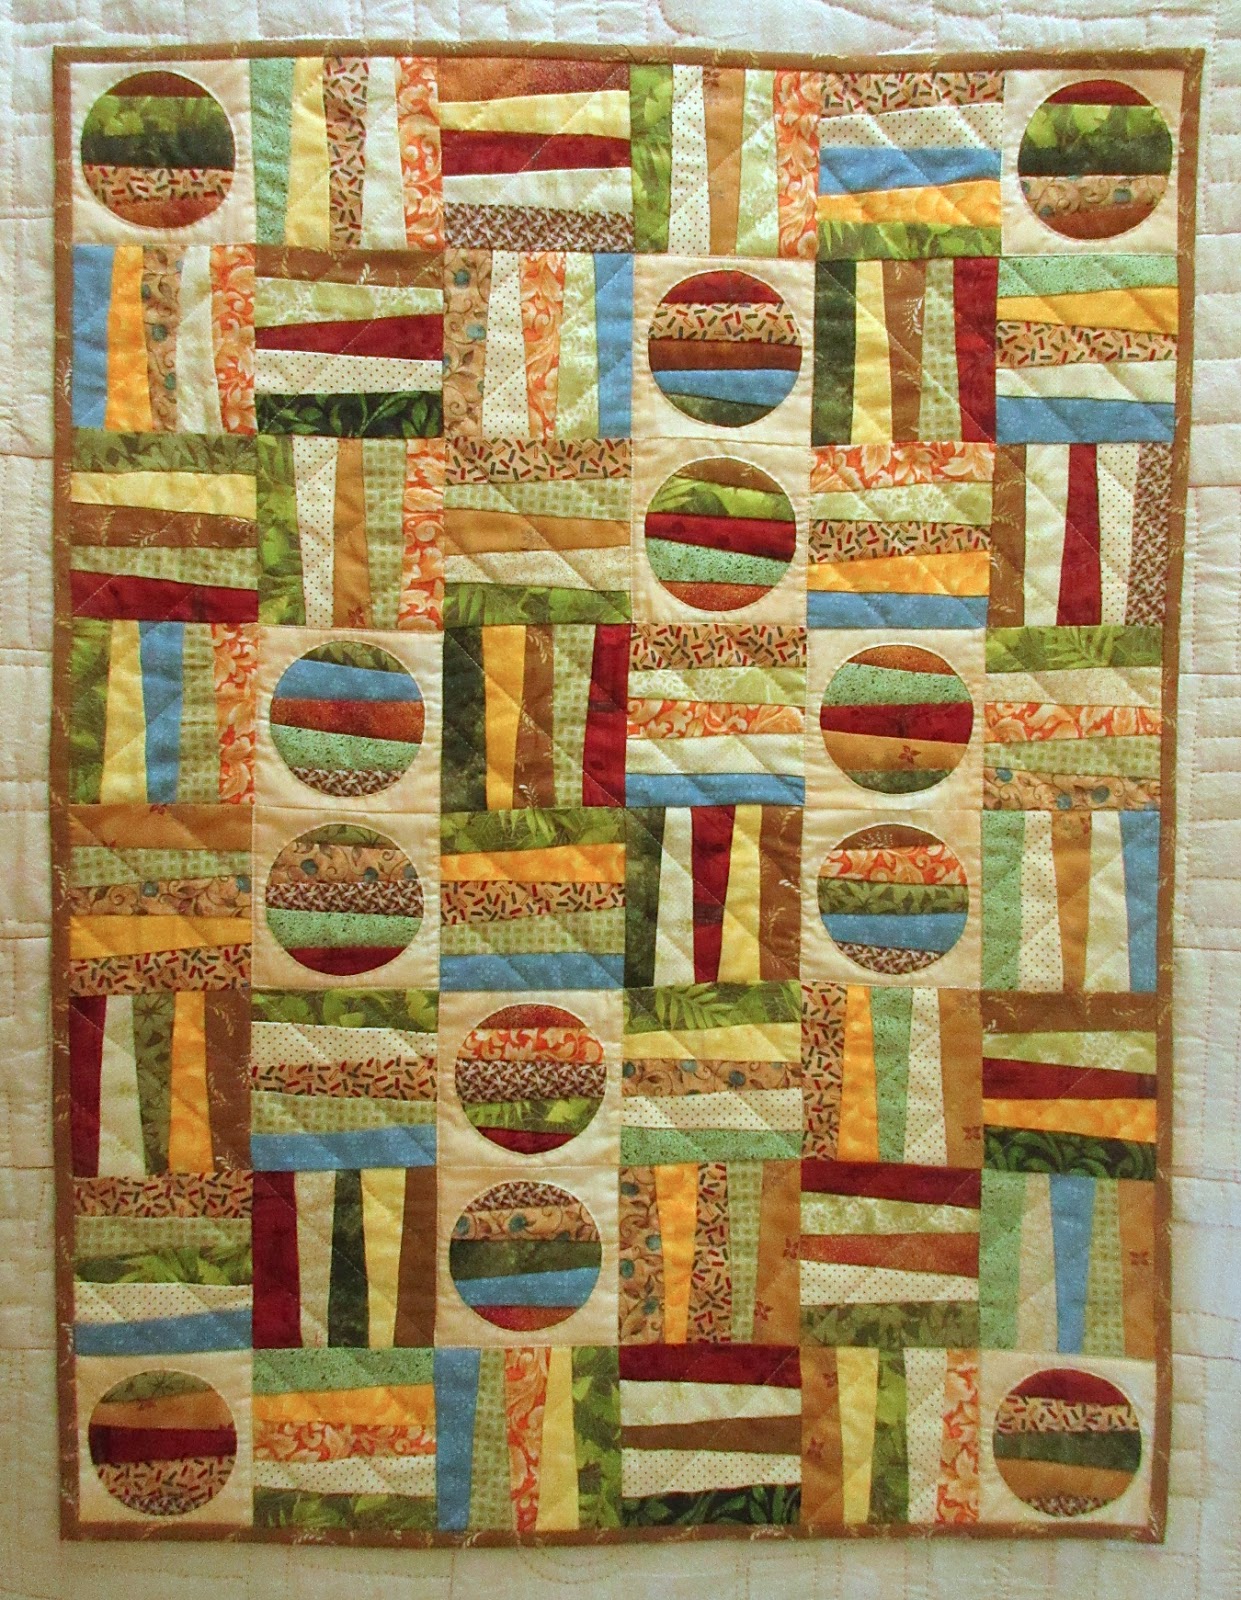
After a few stitched forays which ended up in the bin, I decided that it was time to go back to my circles and strings,combining the two in this 2' x 3' quilt.

It was the right decision as I thoroughly enjoyed making this quilt and it was finished in no time.

I thought that you might like to know the method I used for my foundation pieced string blocks which were all done in the same way.I sorted my fabrics into darks, mediums and lights. 
I used strips of medium and light fabrics for 24 blocks; 

and dark and light fabrics for 12 of the blocks.

The 12 string circles are in mediums and darks.


This is the 4½" paper square for the foundation piecing. I marked the edges at the distances shown and ruled the lines with a pencil, pressing very firmly to make it easier to fold along the line at a later stage.

I cut my strips of fabric a tad over 1½" wide and at least 5" long. Here I have 3 darks and 2 lights.

Starting from the left, I put the first two fabrics right sides together with the back of the dark fabric nearest to me. I laid the paper pattern over the top so that the first pencil line ran along near the right edge of the fabrics, just leaving enough for a small seam allowance, and sewed along this pencil line. It's a good idea to have a small stitch length when sewing to perforate the paper, making it easier to remove at the end.

I finger pressed the seam open, turned the paper over and folded it back along the second pencil line.Now you can see the edge of the second fabric which I cut at ¼" from the fold of the paper. I put the next fabric beneath the second fabric with right sides together and opened up the paper.........

........  ready to sew the next pencil line.

Here I am doing the next fabric strip in the same way.

When all the strips are sewn onto the paper it usually looks a bit of a mess, but is transformed after trimming.

I used the same light background fabric for all my 3¼" circles, but it was mottled so each square differs very slightly. Although I really like the quick method of sewing reverse applique circles by machine (which you can read about in my older post), I chose to sew these by hand using this method - then I could do it sitting on the sofa watching TV in the evening. I used a 4" paper foundation to make the string blocks for the circles.

Here is a link to a printer friendly PDF showing a pattern for the quilt and for the paper foundation............. Strings and Circles Quilt

QUILTING
After sewing all the blocks together it was time to think about the quilting. I wanted something a bit different so chose to emphasise the directions of the dark / light blocks with some diagonal straight lines sewing them by machine and by hand.

You may be able to see the quilting better on the back - 

I had seen the smashing effect of alternating machine and hand quilting on a quilt in Victoria's post "Waste not, want not" , but I think that maybe my lines are too far apart this time to create the desired look. This pic below shows how good it can be.

And a last look at my quilt

Thank you for reading if you made it this far!!

Finally this is a quilt that I have made with some dear friends. We have called it "Bluebird Avenue" and it will be raffled in aid of Macmillan Nurses

 Happy Stitching- Anita x