Showing posts with label Christmas. Show all posts

Friday, 29 September 2023

Larger Quilts at Flowerpatch 2023

 Here are some of the larger quilts on display at Flowerpatch Quilters exhibition in August 2023.

This is Liz's "Colourful Host of Diamonds"  - a cheerful quilt made during lockdown


and her "Hearts 'n' Flowers" - inspired by one of Jo Colwill's quilts and machine pieced by Sandy Chandler of the Quilting Company.


Here is Melody's "Windermere" - a Di Hall Ford pattern and a quilt made in her memory. It was also beautifully quilted by Sandy


and another of Melody's quilts "Coming Home" - made for her grandson who is a Liverpool FC fan.


Two quilts that couldn't be more different!!

This is Pippa's "Mosaic Garden" - designed by Louisa Goult of Sewmotion. I love Pippa's wavy line quilting to contrast with the squareness of the design.


Here is Ellen's "Lockdown Squares" which was quilted by The Quilt Room in Dorking. I love the graduated grey fabric as a border.


This is Ruth's "Countryside Animals" which was inspired by a Janet Clare monthly quilt-a-long. It is a very large quilt and I apologise that I couldn't get quite far enough away for a good photo! Ruth free motion quilted it with her domestic machine.


One from Jennie: "It kept growing bigger!" - this was machine quilted by Jennie on her Bernina


and finally, "Christmas" by Anita H - a quilt that she designed herself.


Lots of lovely little details in this quilt.

Yet more quilts to come next time - Anita S xx

Wednesday, 23 December 2020

Snowman and Robin

It's almost Christmas day and despite all the awfulness of this past year, I'm looking forward to it. Hopefully I'll never grow up!!

I did do a little sewing this year for Christmas and some lino printing, too. This is my second attempt at the "Let it Snow" Snowman.

I enjoyed making the first one so much and was so pleased with the result, that I wanted to do another straightaway, but this time using the sewing machine to do the applique.

This is my first Snowman with the applique sewn by hand

and side by side to compare.

Can you see the difference in his face? I have changed the shape of the carrot nose by adding a curve at the base, and then given him some eyes - I like him so much more.

This is a link to a printer friendly line drawing in case you'd like to make your own Snowman. It has the original carrot nose and no eyes. - Let it Snowman  .He'd look lovely in Redwork.

As usual I lino printed some of my Christmas cards. I love the process and Christmas gives me the excuse to have a go. This year I printed a robin in 2 colours. They look so jolly all lined up on the kitchen table as they dry.

This pic shows the first printing and the finished robin.

I also printed a robin on some fabric and this one is on some soft packaging which feels like a cross between paper and fabric. I added a fabric breast (a bit too dark) and stitching, then went a bit OTT with the borders!

Another year fast approaches and let's hope for better times for everyone - Anita xx

Saturday, 18 January 2020

5 in 1 Flowerpatch meetings!

For various reasons I haven't written posts for our last few Flowerpatch Quilters meetings so this is a bit of a round up.

September
We started the new Flowerpatch year with a 4 corners evening. Sue showed some very intricate embroidery stitches and everyone had a go at sewing them, Iris explained how to make a snazzy zipper pouch for wonder clips (watch the video here), I encouraged members to have a try at using Inktense pencils on fabric and Dy showed how to sew multiples of half square triangles and flying geese.

October
This is our AGM meeting each year and also the evening when we hand over a cheque to our charity. We were delighted to welcome Paul Ford of the Cornwall Air Ambulance Heli Appeal to accept our cheque for £1700 , and to give us a very interesting and amusing talk about the work of the Air Ambulance. I believe that they have now almost reached their target for a new helicopter. After the business of the AGM committee members showed some of their UFOs most of which were many year's old.

November
I was really disappointed to miss this meeting as Abbieanne Searle gave a very entertaining talk about her sewing. By all accounts everyone had a great time - so much so that Abbieanne is making a return visit in late 2020 to do a mini workshop with us.

December
Our Christmas evening at Cowslip Workshops was, as usual, a very friendly and relaxing evening - Jo is the perfect hostess. We sewed stuffed hearts, appliqued with embroidered pictures. Thank you Jo, and also to Arnolda for some of the preparation work.
This is my finished hanging heart

For most of December we had a Christmas tree displayed in Launceston - firstly at St Mary's Church and then in the library. Dawn designed some very cute donkeys and sheep to hang on it.

January
This is the evening when the blocks come together for our new charity quilt. This year we are raising money for the Cornwall Wildlife Trust and very appropriately our quilt is called "Wildflower Meadow". Here are some of the blocks:

Yellow flowers

Red flowers

and Blue flowers


We spent a lovely evening sewing on extra flowers.

Next month,on the 13th February, we are having a question and answer evening when I think we'll all learn a lot by pooling our sewing knowledge. For instance one of the questions will be - "What is your favourite "can't do without" sewing gadget?" I'm really looking forward to hearing everyone's answers ..... and there's cake, too! - should be a fun evening.
There's also another challenge in the offing. We're sewing "Finchies" - all will be revealed.

Happy Sewing
Anita x

Friday, 15 December 2017

Twinchies at Flowerpatch

Each December at Flowerpatch Quilters we have a bit of a Christmas party with nibbles, refreshments and ......... sewing, of course. This year we sewed "Twinchies" which are simply 2" squares of loveliness.

These are some of the cute results after an evening of sewing, chatting, laughing, eating and drinking. As you might anticipate many are still WIPs.

Firstly a Christmas selection

Hearts for the romantics

and lovely others.

So what do you do with a Twinchie?

  • Sew or stick to a blank card for an instant birthday / thank you card.
  • Sew on to a garment or bag
  • Display as a group on a background fabric or in a frame - especially nice if they are themed.
  • Make them into a tiny book.
  • Tuck into presents or cards for friends and family as a little bit of loving extra. As I popped one or two into presents my man said "I hope you haven't made me a Twinchie!!" - Oops, maybe that wasn't such a good idea!

Before the evening I made up lots of Twinchie blanks for those who wanted to get straight on with embellishing without having to neaten the edges with blanket stitch or similar first. I think they look cute even before embellishing! :) ... and it made me want to get stitching immediately.

I thought you might be interested to read how I made these up because although it seems like a simple task I did chew up the edges of quite a few before I settled on this method.

To make 9 Twinchie blanks
Cut two squares of different coloured fabric 7" square and a piece of thin wadding the same size (I used curtain interlining).

Mark the lighter fabric (I used a Frixion pen which disappears after ironing) with squares of a smidging over 2". Start by drawing two outer lines a little way in from the edges of the fabric and at right angles.

Sew along each side of the middle lines with a short length, narrow width, zigzag stitch. Normally I would use a lighter thread on top and a darker thread in my bobbin. This top thread is a little too dark but I want you to be able to see the stitches.

Sew around the edge inside the marked line with the same zigzag stitch.

Cut along the marked lines and iron to remove the pen marks on the edges.

Below are the four twinchies that I made before our meeting

and two that I've sewn since. Launceston Castle was made as a gift for a friend who is off to live in the warmth of Spain.

Earlier this month it was the annual Tree Festival in St Marys in Launceston. Flowerpatch Quilters make decorations to hang on our tree and this year Dawn designed sweet quirky mice with long noses, and also bells.

The church looked beautiful.

Still on a Christmas theme (and as this may be my last post before the 25th) I found Rudolf wandering in our garden recently.

He looked so cold, poor "dear", that I brought him indoors to keep him warm until Christmas Eve.


I'm linking up with Crazy Mom Quilts Finish it up Friday, although I think my Twinchies finish at even smaller than Amanda Jean's lovely tea-pouches! :)

Happy Christmas - Anita x

PS The next Flowerpatch meeting is on Thursday 11th January when we will be sewing the blocks together for our Rainbow Quilt - this year's charity quilt.

Thursday, 15 December 2016

A Fabric Christmas at Flowerpatch

Despite a very misty evening there were plenty of members at the Flowerpatch Quilters December meeting and we had a relaxing time sewing some simple folded Christmas decorations, chatting and eating yummy mince pies.
These are the three designs that we sewed with links to the methods for making:

Folded 5" circle making a square

Folded 5" pentagon making a star

and this is a link for printing out different sizes of pentagon


Folded triangle with 5" long sides

Below are some pictures from the Flowerpatch 2016 exhibition last August, where the theme in one of the rooms was "A Fabric Christmas"


Happy Christmas all - Anita x

Thursday, 1 December 2016

Eva Owl - lino printing

A while ago I had a brilliant day at Cartwheels Craft Centre doing a lino printing workshop with Louise Nichols. (Louise gave a talk at the last Flowerpatch Quilters meeting which you can read about in a previous post.) We could draw our own design to print and I decided to do Eva Owl from my wall hanging "It's a Hoot" for my first attempt.

This is how she has finally turned out!

On the workshop day we did the drawing, then lino cutting and finally printing all with helpful and friendly advice from Louise. This is one of the prints that I did then.

After embellishing with a little applique and lots of stitching I ended up with this picture - Eva is 5" tall.

I felt that she was a bit lost in the background so I changed the lino and cut more away to give me extra areas of white like this

So here she is again with less, and simpler, stitching than before - mostly straight stitch, fly stitch, couching and french knots.

I'm really happy with the result this time and feel encouraged to try some more designs.

When I started blogging I was determined that I would write about sewing and only sewing, but as Christmas approaches I just have to show you these cute wood slice snowmen 

..... and Father Christmasses, all made from our homegrown wood.

I got the idea for these on Pinterest which is a wonderful resource for all things crafty.
Oh! what fun! - Anita x

PS. Flowerpatch's 8th December 2016 meeting has moved venue to The Epworth Room at Central Methodist Church

And there is a brilliant Craft Fair at Upton Cross, nr Liskeard which starts tomorrow (Friday, 2nd December, 2016) for 3 days

Saturday, 29 October 2016

Christmas Circles

Follow my blog with Bloglovin

Well I'm really getting ahead of myself this year!! Most years I sew a little something to add to my collection of homemade Christmas decorations, but this is usually a last minute affair when there's less than a week to go!

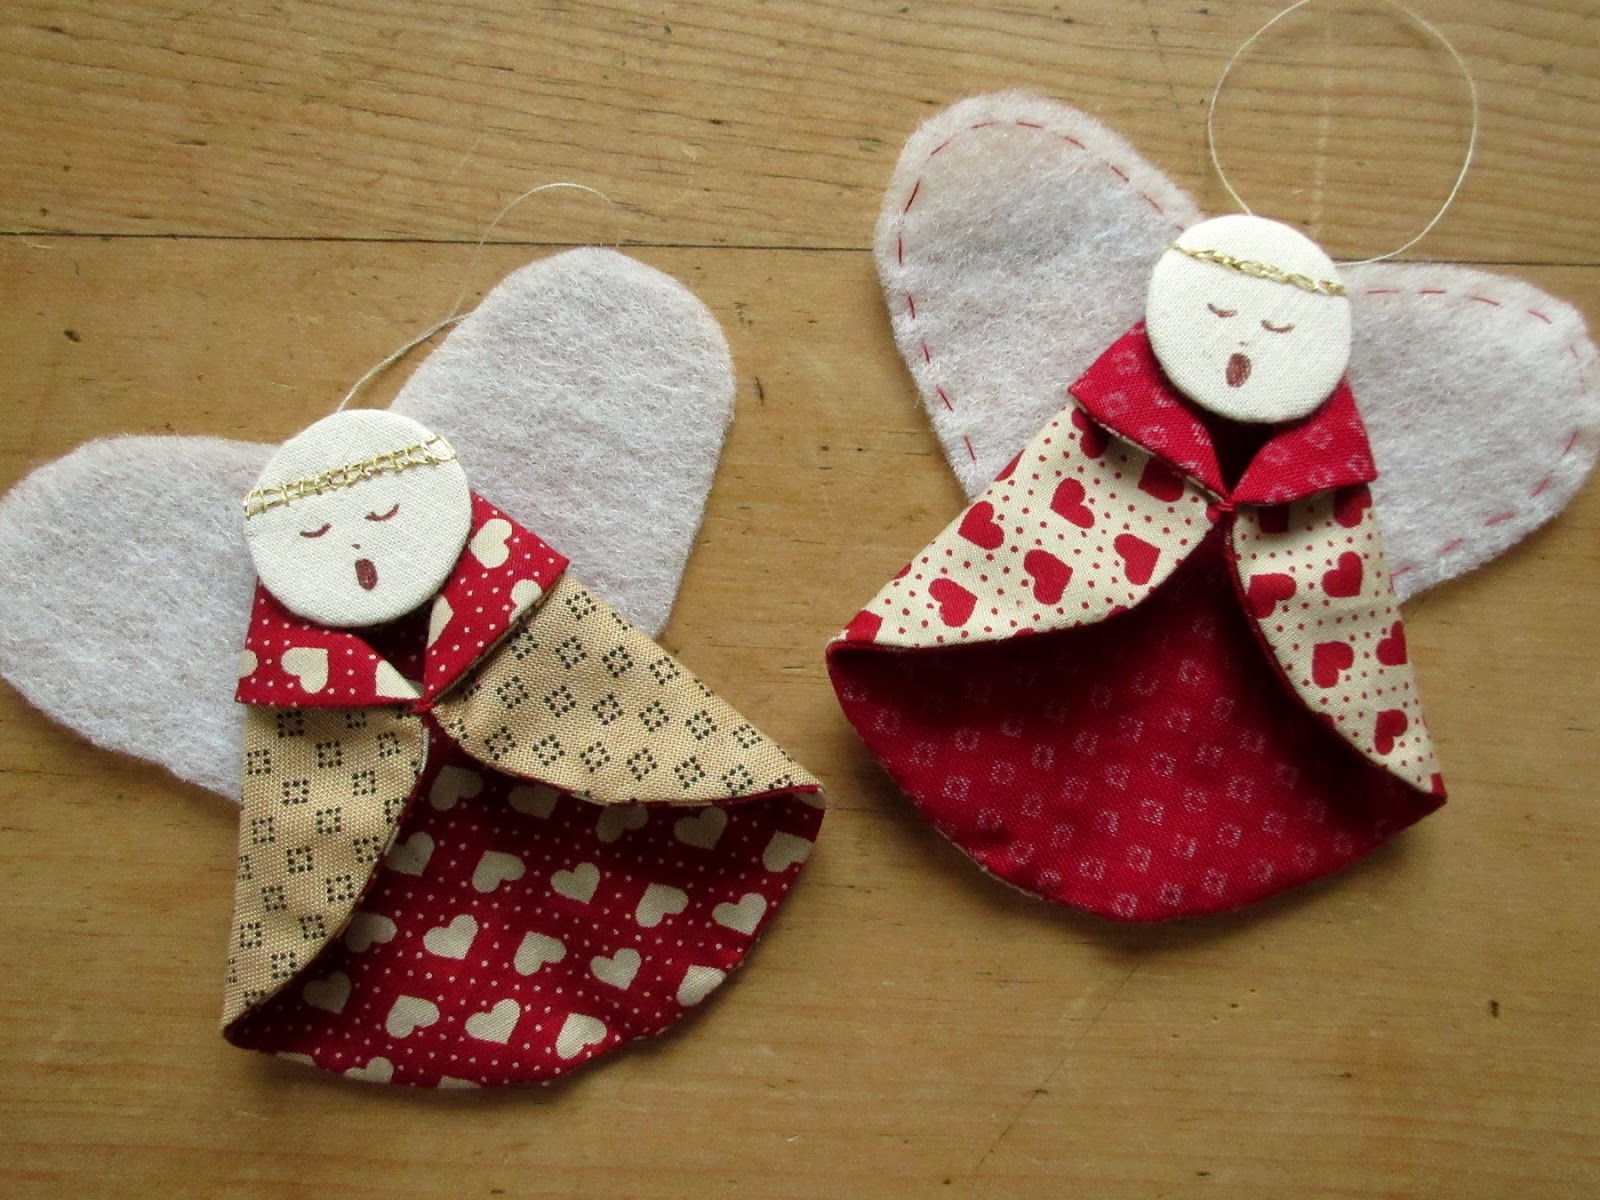
I've recently seen two lovely tree decorations that take my fancy especially as they both involve a folded circle and I have tried them out already - Angels and Squares

I used a circle 4" across to make mine but this does make the squares a bit teeny at only 2", so possibly a 5" or 6" circle would be better (depending what you have handy to draw around).

I cut two contrasting squares of fabric ½" larger than my circle (the corners of the square give you something to hang onto while you're sewing) and marked one of them on the back using my circle template - a small bowl. When you mark fabric with a pen or pencil it's helpful to lay it on a piece of fine sandpaper to stop it moving about.

I put the two fabrics right sides together and sewed by machine on the marked line, starting and stopping with a back stitch to secure, and leaving a gap through which to turn the circle the right way out. Curves like this are easier to sew if you use a small length stitch.

I trimmed off the excess at the corners and turned the circle the right way out, giving it a bit of a press. Then sewed up the opening.

With the circle you can make either an Angel with this link from Selimut-ku
(For my angel's wings I used a heart cut from cheap 2oz polyester wadding which I had ironed between two sheets of paper to make it stiff and thin)

or a folded decoration with this link from Katrina's Tutorials - do have a look, Katrina's are so pretty.

Both of these are really quick and simple to make and might be ideal for Christmas craft stall sales. 
Happy Sewing - Anita x