Showing posts with label this & that. Show all posts

Wednesday, 28 February 2024

Three finishes and a start

I was wanting some hand sewing to do while stewarding at our Flowerpatch exhibition last August and decided to try and improve my applique skills. I started to sew these odd little flowers with no particular plan in mind. I do like sewing that just evolves. With nine sewn I put them in a block with borders of flying geese, scrappy strips, squares and "square in squares".

After sewing these together, and adding a bit more, I have this:


It measures 33" squarish and I do like the quietness of the creams and beiges.

The individual blocks look like this

and this


 I find Pinterest a great source of ideas and came across a lovely illustration of a bird and flowers by Geninne. I particularly liked the way that the bird was sitting on the edge of a flowerpot.

With a few changes this is my version measuring 8" x 9"


Sharon Blackman is someone who always inspires. She has so many ideas for her wall hangings and they are beautifully whimsical. I love the way that she frames her cottage pictures with flowers and just had to have a go at my own.


It is all raw edged applique and the flowers are applied with steam-a-seam and a stitch or two. Getting ever smaller this is just 7" square.

Another sewer whose ideas I love is Jo Avery. I find her relaxed approach to needle turned applique by hand so helpful. Click on her name and it will take you to the blog post she has written which has got me sewing my latest project. Here are two 5" blocks that I have completed ..... or maybe not as I still may add some more embroidery.

Have fun with your stitching

Anita xx

Thursday, 27 April 2023

Block Printing and Slow Stitching

 We had a super evening at Flowerpatch Quilters recently when Iris L. brought along her wooden printing blocks and paints so that we could all have a go at printing on some calico. Iris explained how to do it - that you shouldn't use too much paint or press too hard on the blocks and have a soft board underneath, thus avoiding splurges!

Iris had given me a few prints at the previous meeting and I had great fun thinking of ways to use them in sewing.


The little hedgehog is on a needle case, there is a greetings card, easy peasy pouches for specs and some slow stitched hangings.

I so enjoyed making the small hangings that I made four of them. They are all approx 6" wide. The first was using the poppy prints:


The next one used two of the sunflower prints:


Then I did a very blue one:


Finally I used the two prints that I printed during the Flowerpatch meeting to make this one:


I started each little hanging with a layer of wadding and a piece of curtain fabric on top. I laid the print, or prints, on top of this and then added various rectangular scraps of fabric (I save lots of tiny pieces from other projects), overlapping them until the background fabric was more or less covered. So as not to overwhelm the prints I tended to use pale fabrics. Once I was happy with the layout I tacked the fabric pieces down with big stitches. Then it's just a case of stitching to hold the edges of the rectangles down and adding some embellishment. I did some stitching on the prints each time, but without obliterating all the printing. Sometimes it's hard to know when it's finished! I laid my work on a another piece of fabric without trimming, marked the edges, machine zigzagged all the way around and trimmed close as I dared to the stitches.

Here are some pics of a few details.


I have put three of the hangings together, but the blue one didn't look quite right with them.


I used the buttonhole edges of shirts to sew them in a line (I have no idea why I was saving these - maybe to tie a plant to a stake in the garden!) and these also make hanging loops at the top.


Happy Slow Stitching - Anita x

Wednesday, 1 March 2023

A Little Slow Stitching

I've recently finished sewing this small wall hanging in raw-edge applique and stitch, and I'm pretty pleased with it. It's been so nice to work with jolly, bright colours while the days are still short and the weather is dull.


It measures approximately 9" x 11" finished.

I started by drawing the design on some paper, traced the flower shapes onto freezer paper, cut out the shapes, ironed them onto the right side of my chosen fabrics and cut them out. I only cut out the biggest 'circles' of the large flowers and just roughly cut the edge off these paper patterns for the smaller 'circles' as I went.

I sewed the stripey blue background fabric to some wadding with free motion machine quilting and marked the flower positions and stalks with a frixion pen, using my paper design and a light box.

I sewed the stalks of the large flowers first using a folded strip of fabric held in place with green thread across it.

Then I did the large flower top left sewing the fabric down with whatever stitches took my fancy.


Next came the yellow flower at top right, which I sewed into position with matching thread, leaving the finishing touches until later as I was excited to do big flower no.2 in the centre.


I really like the way the white dots on the green fabric show through the stitches.

After this I attached the final two yellow flowers and couched down some thick cotton thread in green for the stems. The red stitch across the top of the flowers is fly stitch.


A bit more embroidery to the yellow flowers before I sewed some brown background stalks with whipped running stitch and more fly stitch.

My picture is framed with a narrow flange of bright orange, a wide plain green border and brown binding.


In this photo you can see the stem of a large flower.

It makes me smile every time I see it - what more can you ask?!

Happy stitching

Anita x


Monday, 30 January 2023

Birds

This past weekend it has been the RSPB Big Garden Birdwatch here in the UK and it's been a pleasure to have the excuse to peer out the windows and count the birds who come to the garden and the bird table. There have been lots and lots - I do love them so.

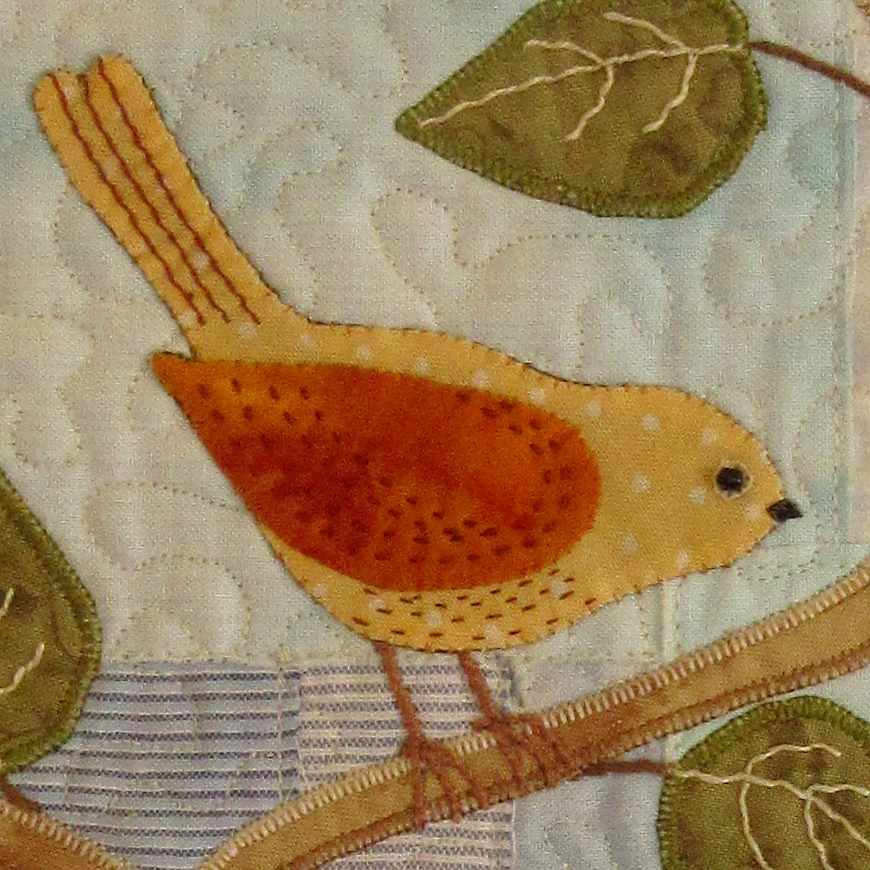
Just lately I've finished two quilted pictures which include birds. They were inspired by paintings that I saw on Pinterest which is a great source of ideas for me.


The first that I made is on the left and I tried to improve a few things, particularly the method of making, when I sewed the second. I didn't like the hand quilting of the first as I thought that it distracted from the applique. There is only one thing that I like more about the first picture! 

When I'm about to start a new project it's sometimes difficult to think just where to begin so I thought I would share my method with you. This is the method that I used for the second bird picture:

I drew my picture onto paper and transferred it, in reverse, onto sturdy calico, using a light box.

I sewed a raw edged background, in various blue rectangular fabric scraps, onto some pale blue striped fabric laid onto the undrawn side of the calico. I stitched these down by machine, sewing around the uncovered raw edges. I used the pale blue striped fabric underneath so that it didn't matter if there were gaps between my rectangles.

Next I sewed on the tree branches, placing brown fabric onto the blue background, and using my light box to get the positions of each one right. I sewed with a small straight stitch, from the back along the drawn lines on the calico. I trimmed each branch as close as I could to the stitches. I then used a machine blanket stitch to secure them, with light thread on one side of the branch and dark on the other. (This is what I don't like in the second bird picture and I'd rather that I'd used a zigzag stitch as I did in the first picture.)

I laid green fabric on the blue background in the position of a leaf, again using the light box to aid me. I sewed the leaf shape from the back of the picture by machine, with small straight stitches. I trimmed off the spare fabric close to the stitches and then used machine blanket stitch to secure.


After marking the position of the flowers and the birds on the front, I laid my work onto some wadding and free motion stitched between the leaves and branches.

I had already sewn the birds onto a thin piece of fabric with needle turned applique, and embroidered the wings, tail and breast. Now I could easily cut them out with a seam allowance of the thin fabric which I turned under as I sewed them into position. I embroidered a beak, legs and added a bead eye.


I embroidered the leaves and their stalks. For stalks I usually sew a small running stitch which I then whip with the same thread. I drew all the little flowers onto the backing paper of some Steam a Seam, laid this on the back of cream fabric, cut them out and ironed them down into position. I did a little stitch at the edge of each petal and tiny french knots in the centre of each flower, and sewed their stalks.


Just a backing fabric and binding left to do, with little triangles in the corners on the back to hold a hanging stick.


These are the close up pics from my first picture - leaves, a bird and berries.


For the berries I ironed stabilizer onto the back of red fabric and my husband punched out the circles with his hole punch! I sewed them in place with stitches radiating from the centre.

These two were lovely to do and they hang in my kitchen. They may yet be joined by another!

Happy stitching - Anita x


Wednesday, 24 August 2022

In the Tree / Under the Tree

One of the challenges given to Flowerpatch Quilters members before lockdown, when we anticipated having our yearly exhibition in 2020, was to sew a 5" x 5" square with the title of either "In the Tree" or "Under the Tree". The only stipulations were that the "Ins" should have a blue background and the "Unders" should have a beige or brown background and they should not have a binding on the edge. The resulting squares were displayed at our recent exhibition.

Here are some pictures of those which have more detail.

In the Tree

Under the Tree

I loved doing this!!

Happy Stitching

Anita x

Monday, 3 May 2021

Slow Stitching - Flowers

I've been doing more slow stitching in the evenings, sitting on the sofa surrounded by tiny scraps of fabric and colourful threads, needles, pins and scissors at the ready. I so enjoyed sewing my Slow Stitching - Shapes that I thought I would do something similar but with a flower theme.

These are all about 6" square and, as with the "Shapes" I didn't plan any of the sewing, but just let the pictures evolve. Each one started with a square of blue stripe fabric backed with some wadding, and I started the sewing with a few pieces of fabric in the background.

This one began with the fence, then the dotty green fabric, the stitched trellis, stems, leaves and finally flowers.

I started this one with the leaf shapes, then stems, flowers, stitched lines at the bottom and finally the bee. (excuse the stray thread which I've just noticed)

The order for this one was green fabric strips, thick stems, flowers and finally the stitched grasses.

And for this one (which was actually the first I sewed) I started with the strips of brown and green fabrics in the background, then the stems, leaves, flowers, grasses and finally the stitching across the bottom.

I plan to make them into a zigzag book so that when it is opened they will be in a horizontal line like this:


To finish, I zigzagged the squares onto a backing fabric and then trimmed around.

Still having fun - hope you are too!

Anita xx

Sunday, 4 April 2021

Springtime Primroses - lino printing

The primroses have been flowering beautifully this Spring, probably because of all that rain we had over the Winter - they do prefer it wet. I've joined a Facebook group - Handprinted Collective, and each month they have a prompt for a print to do. It's been great for me as I had more or less stopped printing except for my Christmas cards. March's prompt was "Spring" so I did "Primroses beneath the Beech Hedge" and having got a fairly good print or two on paper, I also did one on calico for stitching.

I finished my picture with a border that looks much like a picture frame and added the backing by the bagging method where you put right sides together and sew all the way around - and yes, I do mean ALL the way around.This was a tip from Brenda Thomas who sews all the way around and then cuts a slit in the backing to turn her work the right way out. This slit is covered by her hanging sleeve. I covered mine with a label.

This is the same print on paper:

After rolling the green onto the lino, I stippled on some brown for the hedge, using a stencil brush, before printing, and then I stippled yellow onto the flower centres after printing.

Another prompt from Handprinted has been "Morning" when I did "That Early Morning Feeling"

And this is the print on paper

After printing on paper I found it quite difficult to make the transition to fabric as you have to put a lot more ink onto the lino. I print paper with the lino underneath and fabric with the lino on top - it seems to work better that way around ......... well not always as you can see!! :)

Having fun - Anita xx

Sunday, 14 March 2021

Slow Stitching - Shapes

While we can't get together for our meetings (it's been a year since our last monthly meeting because of Covid19) we have been sending out a regular email to Flowerpatch Quilters members with any news and a monthly challenge. For February I devised a mini slow stitching workshop that everyone could do, or not, as they liked, at home. I really enjoyed doing it myself and completed six 6" blocks.


My own idea of slow stitching is that when you start you have no clear plan in mind and just let the applique and hand stitching grow. The most difficult bit is actually getting started! For that reason I suggested cutting out a circle; square or rectangle; and a triangle and sewing these to the background. The full instructions / suggestions can be found in my printer friendly pdf file - Slow Stitching Mini Workshop

I have sewn my six blocks together with thick thread to make hinges. They can now be hung vertically in a single line, or folded concertina fashion making a "book". This is closed with a strip of cute house fabric and a button. To make this work I sewed three buttonholes in the strip and as I do very little normal type sewing, this was scary and exciting for me. :) I don't know why I was concerned - I just pressed start and the machine beeped when it was finished - I love my new machine!

This pic shows my blocks and on the back you can see the strip hanging down. The top of the strip has one of the buttonholes as a hole to slip over a nail or hook.


And this pic shows them folded into my "book" -  neat and tidy.


All in all a very enjoyable project - so much so that I've now started on slow stitching concertina book 2 with the theme of flowers.

Happy Stitching - Anita x

Monday, 1 February 2021

Connections A4 Quilts

 Like many I really missed going to Quilt exhibitions last year with every one cancelled from the Spring. My friends and I always go to the one held at Westpoint in Exeter, by Grosvenor Shows, at the very least. Each year they do a journal quilt challenge and we often enter a pair of A4 quilts, but sadly these were only displayed at one or two shows. Here are the two that I entered for the competition:

"Connections" immediately made me think of all the ways that we talk to our friends and family, and exchange ideas, photos etc. I'm sure you recognise all the symbols.


Below this are some smart phones with their screens lit up.


Then there are the connections we make when we press the on switch and the buttons we use to control DVDs etc

And below these are a bank of batteries and their connecting wires


The 2021 Journal Quilt Challenge has been postponed until 2022 and the title is "Home".

Lots of time then to think of something good to sew - Anita xx

Sunday, 3 January 2021

Recycled Denim Bags

It's always the knees of denim jeans that wear out and after patching one time, enough is enough. I usually save the backs of the legs for future patches and sometimes the denim pile builds up so that I can make a bag ...... or two.

I made two bags before Christmas.

This first has a panel of appliqued red leaf shapes on the front, which I have embroidered. I sewed a flange of red and yellow striped fabric around the panel and used the same fabric for the long handle. The bag has a zip closure at the top, just like a pouch and a boxy bottom.

The back of the bag has a handy zipped pocket.

This second bag is a tad more sedate and the panel has appliqued circles, a fabric insert and white hand stitching.

Again, the back has a zipped pocket.

These are links to two previous post about similar bags:-

2 Sashiko Bags and More Sashiko - More Bags

Happy New Year to you all - 2021 must surely be better than 2020!!?? - Anita xx