Monday, 18 October 2021

Mystery to Me - sewing blocks together

 I'm feeling a tad excited as, in the last couple of days, I've started to sew some of the blocks together for my "Mystery to Me" quilt .... and it's no longer a mystery to me.

These are the blocks that I made last:

All measurements include seam allowance.

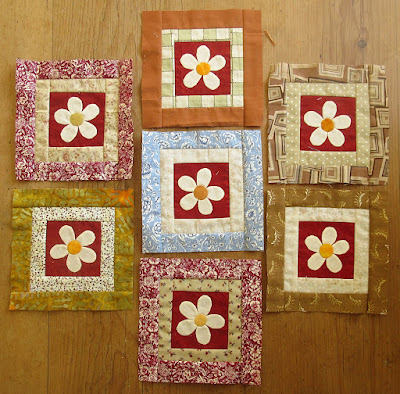
6.5" flower blocks

more 5" square blocks

and more 3.5" square blocks

The quilt is made from 9 similar sections and I laid all these out, one at a time, and photographed them. Then I could look at them in their final positions on the computer screen and see if any blocks needed to be swapped. There were just a few.

So this is the middle section all pieced (27.5" x 30.5")

and this is the middle row right section. (24.5" x 30.5")

It's certainly going to be a busy quilt!! Only 7 more sections to go!

Happy sewing - Anita xx


Wednesday, 1 September 2021

Mystery to Me Quilt - circles

My Mystery to Me Quilt is continuing to grow and these are some of the blocks I have made since my last post.

All my measurements below include the seam allowance of 1/4"

Circles on calico with a border - these measure 6.5" square. The circles are hand appliqued so that I could sew them in the evening while watching TV.

Light circles on a 3.5" darker square. These are hand appliqued too, and I usually cut the square slightly larger than the 3.5" as I never get the circle exactly in the middle and I can trim to size after sewing.

More 6.5" square blocks

More 5" square blocks

More 2" x 5" stripey blocks

Also 3.5" square blocks looking rather cute

Finally these 6.5" square blocks have a centre of calico appliqued with 2 small circles and a curved line. Made on a whim!

I actually have a design plan now and some very rough drawings on squared paper. I'm hoping to make the quilt in 9 separate sections which will be quilted before they are sewn together. More about this next time.

These are the links to the other Mystery to Me blog posts:

Mystery to Me Quilt - flower blocks

Mystery to Me Quilt - squares and strips

Happy sewing - Anita x

Friday, 23 July 2021

Mystery to Me Quilt - squares and strips

I've been gradually making blocks for my Mystery to Me Quilt which I started in March this year. I wrote about the initial nine flower blocks in this post. I still don't have a definite design but all my blocks are a multiple of 1.5" on each side (+ the seam allowance) and I'm making multiples of nine of each type of block.

Here are 18 square blocks measuring 5".

I really think that blue in the bottom right corner may have to go!

9 square blocks measuring 6.5"


9 square blocks measuring 8"


and 18 stripey blocks 2" x 5"


Finally 9 rather odd blocks measuring 5" square.

Believe it or not, these were inspired by the quilts of Erin Wilson. I just love the way that her blocks all contain parts of buildings - they look so interesting. I decided to sew parts of flowers in the centres of my blocks and I really like the effect!

Now I've started sewing blocks which contain circles - you can never have too many circles in a quilt! :)

Here is a pic of the 9 flower blocks that I made first:


Something else that I've been making, and finally finished this week, is a banneton for my sourdough. I used it for the first time today.

It is made with 3 strips of curtain material, plaited and coiled, and held together with thin string. When I use it I line it with a piece of linen cloth before adding the dough.

Happy Stitching - Anita x

Monday, 3 May 2021

Slow Stitching - Flowers

I've been doing more slow stitching in the evenings, sitting on the sofa surrounded by tiny scraps of fabric and colourful threads, needles, pins and scissors at the ready. I so enjoyed sewing my Slow Stitching - Shapes that I thought I would do something similar but with a flower theme.

These are all about 6" square and, as with the "Shapes" I didn't plan any of the sewing, but just let the pictures evolve. Each one started with a square of blue stripe fabric backed with some wadding, and I started the sewing with a few pieces of fabric in the background.

This one began with the fence, then the dotty green fabric, the stitched trellis, stems, leaves and finally flowers.

I started this one with the leaf shapes, then stems, flowers, stitched lines at the bottom and finally the bee. (excuse the stray thread which I've just noticed)

The order for this one was green fabric strips, thick stems, flowers and finally the stitched grasses.

And for this one (which was actually the first I sewed) I started with the strips of brown and green fabrics in the background, then the stems, leaves, flowers, grasses and finally the stitching across the bottom.

I plan to make them into a zigzag book so that when it is opened they will be in a horizontal line like this:


To finish, I zigzagged the squares onto a backing fabric and then trimmed around.

Still having fun - hope you are too!

Anita xx

Sunday, 4 April 2021

Springtime Primroses - lino printing

The primroses have been flowering beautifully this Spring, probably because of all that rain we had over the Winter - they do prefer it wet. I've joined a Facebook group - Handprinted Collective, and each month they have a prompt for a print to do. It's been great for me as I had more or less stopped printing except for my Christmas cards. March's prompt was "Spring" so I did "Primroses beneath the Beech Hedge" and having got a fairly good print or two on paper, I also did one on calico for stitching.

I finished my picture with a border that looks much like a picture frame and added the backing by the bagging method where you put right sides together and sew all the way around - and yes, I do mean ALL the way around.This was a tip from Brenda Thomas who sews all the way around and then cuts a slit in the backing to turn her work the right way out. This slit is covered by her hanging sleeve. I covered mine with a label.

This is the same print on paper:

After rolling the green onto the lino, I stippled on some brown for the hedge, using a stencil brush, before printing, and then I stippled yellow onto the flower centres after printing.

Another prompt from Handprinted has been "Morning" when I did "That Early Morning Feeling"

And this is the print on paper

After printing on paper I found it quite difficult to make the transition to fabric as you have to put a lot more ink onto the lino. I print paper with the lino underneath and fabric with the lino on top - it seems to work better that way around ......... well not always as you can see!! :)

Having fun - Anita xx

Saturday, 27 March 2021

Mystery to Me Quilt - flower blocks

Every now and then I am sorely tempted to do a mystery quilt, especially when Bonnie Hunter starts one of hers as they always turn out amazing and everyone made is so different. Sadly I never make the commitment and I'm never short of things that I want to sew anyway.

I do think though that it's about time I made another bed quilt as it's been a few years since my last. I'm just having a great time making small things - the smallest so far being Twinchies - I haven't yet made any inchies! :) The bed quilts that I've enjoyed making the most have been those that just start with a block that I like, but with no definite idea as to the overall plan or even the next step. Of course it has to be a scrap quilt as I don't know how much fabric I shall need so I want to be able to add new fabrics as I go along.

So that's where I am at the moment with my "Mystery to Me" quilt. These are the first nine blocks:


These measure 10.5" square ( + seam allowance) and I think that if I make all my blocks a multiple of 1.5" I shan't go far wrong!!??? :).

The blocks above are sewn by machine apart from the centres of the flowers. The background circles are reverse appliqued using freezer paper by this method, but sewing with my blind hem stitch,

and the flowers are made with the background fabric which was cut out when making the circles. The flowers are marked on the fabric with a frixion pen and then stitched around with machine applique stitch, (no fusible web). I carefully cut away the excess fabric after sewing, as close to the stitches as I dare.

To me, each of my flower blocks has it's very own personality, which changed a little every time I sewed on another border of fabric - I find myself talking to them as I sew! ...... oh dear, lockdown is finally getting to me!

- Anita xx


Sunday, 14 March 2021

Slow Stitching - Shapes

While we can't get together for our meetings (it's been a year since our last monthly meeting because of Covid19) we have been sending out a regular email to Flowerpatch Quilters members with any news and a monthly challenge. For February I devised a mini slow stitching workshop that everyone could do, or not, as they liked, at home. I really enjoyed doing it myself and completed six 6" blocks.


My own idea of slow stitching is that when you start you have no clear plan in mind and just let the applique and hand stitching grow. The most difficult bit is actually getting started! For that reason I suggested cutting out a circle; square or rectangle; and a triangle and sewing these to the background. The full instructions / suggestions can be found in my printer friendly pdf file - Slow Stitching Mini Workshop

I have sewn my six blocks together with thick thread to make hinges. They can now be hung vertically in a single line, or folded concertina fashion making a "book". This is closed with a strip of cute house fabric and a button. To make this work I sewed three buttonholes in the strip and as I do very little normal type sewing, this was scary and exciting for me. :) I don't know why I was concerned - I just pressed start and the machine beeped when it was finished - I love my new machine!

This pic shows my blocks and on the back you can see the strip hanging down. The top of the strip has one of the buttonholes as a hole to slip over a nail or hook.


And this pic shows them folded into my "book" -  neat and tidy.


All in all a very enjoyable project - so much so that I've now started on slow stitching concertina book 2 with the theme of flowers.

Happy Stitching - Anita x

Monday, 1 February 2021

Connections A4 Quilts

 Like many I really missed going to Quilt exhibitions last year with every one cancelled from the Spring. My friends and I always go to the one held at Westpoint in Exeter, by Grosvenor Shows, at the very least. Each year they do a journal quilt challenge and we often enter a pair of A4 quilts, but sadly these were only displayed at one or two shows. Here are the two that I entered for the competition:

"Connections" immediately made me think of all the ways that we talk to our friends and family, and exchange ideas, photos etc. I'm sure you recognise all the symbols.


Below this are some smart phones with their screens lit up.


Then there are the connections we make when we press the on switch and the buttons we use to control DVDs etc

And below these are a bank of batteries and their connecting wires


The 2021 Journal Quilt Challenge has been postponed until 2022 and the title is "Home".

Lots of time then to think of something good to sew - Anita xx

Sunday, 24 January 2021

Slow Stitching Circles

I've had a lovely time stitching circles and half circles in the evenings as in my previous post. I didn't really want to stop! They are all raw edged, with lots of embroidery, and thicker threads couched down around the edges, etc. The most difficult bit has been deciding what to do with them - to display them nicely. I did wonder if a simple regimental positioning would be best ..... and I'm still wondering, but I settled on a sort of vase of flowers.


I started by pinning a few rectangles of cream fabric on some calico, backing it with wadding, and then quilting from top to bottom with wavy lines. I thought the applied fabric would make the background a little more interesting but they don't really show up much. I appliqued the circles onto the calico, sewed the stems, appliqued on the vase and then sewed the thin wiggly lines in brown. The stems are thick green cotton thread which is couched down, and the wiggly lines are whipped straight stitch.

Here are a few pics of the individual "flowers"

And the vase.


The half circles sewn to the top and bottom of the vase were originally intended as leaves, but they morphed!

This was a really enjoyable experience apart from all the decision making once the circles were sewn - sometimes you feel that you haven't got another decision in you! That's when sewing gets put to one side, and may never re-emerge! :)

Happy Stitching - Anita x


Sunday, 3 January 2021

Recycled Denim Bags

It's always the knees of denim jeans that wear out and after patching one time, enough is enough. I usually save the backs of the legs for future patches and sometimes the denim pile builds up so that I can make a bag ...... or two.

I made two bags before Christmas.

This first has a panel of appliqued red leaf shapes on the front, which I have embroidered. I sewed a flange of red and yellow striped fabric around the panel and used the same fabric for the long handle. The bag has a zip closure at the top, just like a pouch and a boxy bottom.

The back of the bag has a handy zipped pocket.

This second bag is a tad more sedate and the panel has appliqued circles, a fabric insert and white hand stitching.

Again, the back has a zipped pocket.

These are links to two previous post about similar bags:-

2 Sashiko Bags and More Sashiko - More Bags

Happy New Year to you all - 2021 must surely be better than 2020!!?? - Anita xx