Sunday, 29 March 2015

Step by Step Quilt Binding

Binding a Quilt - not my favourite task, but I know it's going to make all the difference to the look of a quilt and I will be so pleased with myself when it's done - that is if I get it right!!

Melody had lots of tips about binding at Flowerpatch Quilters last meeting and these are her measurements for cutting the strips.

  • The length of binding you need will be the distance around your quilt + 9"
  • For ¼ "  single binding cut on the straight of grain - cut strips 1 ½ " wide.
  • For ¼ "  double layered binding - cut strips 2 ¼ "  wide.

So armed with lots more info from Melody, this is me binding a double bed quilt. Due to having a limited amount of the fabric I want to use for the binding, I'm doing a single layer.

I cut all my strips across the fabric from selvage to selvage. With the back of a piece binding facing me I fold a corner down at 45 degrees and finger press. This marks my sewing line with a crease.

I lay this binding strip at right angles to another piece with right sides together, pin and sew along the crease.

I trim off the excess fabric and press the seam open. Repeat until you have one long length of binding.

I wind this on to a piece of cardboard and reward myself with a cup of tea and chocolate muffin!

Reinvigorated, I'm now ready to sew the binding on, but before I begin hadn't I better tack all around the quilt just near to what will be my sewing line? I think so - it will all go much better and quicker if I do and I hate unpicking! I don't trim the wadding and backing until the binding is sewn on.

I fold the beginning of the binding at 45 degrees and pin to the edge of the quilt. I think a good starting point is along the top edge near to the left corner.

I'm using my even feed (walking) foot on my machine with the lightest pressure. I sew until ¼ "  from the corner and finish off with a few back stitches.

Here is my binding sewn on as far as the corner. I fold it back so that it's at right angles.

Then fold it down on itself so that the fold is level with the edge of the quilt. Pin and it's off again with the sewing machine.

Carry on like this around the quilt until you're at the beginning and sew the end of the binding over and passed where you started.

Phew! I think I need a glass of wine - or maybe even a little lie down!

Revived I trim off the wadding and backing, turn the binding to the back with a small hem and slip stitch into place by hand ....................................................and finally - Voila!
Corner front and back

and the join front and back.

It's not gone too badly and I hope Melody is proud of me, but I do wish I'd followed my own advice and done that tacking all the way around!    :)

I have written a one page printer-friendly pdf with instructions and line drawings which you may find helpful.
This is the link
Binding a Quilt

Keep smiling - Anita

Saturday, 21 March 2015

Four Corners at Flowerpatch

We love Four Corner evenings at Flowerpatch Quilters, they're always so chaotic and friendly. This time we had Iris doing Curved Piecing, Sue with Rotary Cutting, Melody doing Binding and me with Badges.


Iris showed us her take on curved piecing. She laid out some beautiful blocks on her table and they looked so difficult to do!


These are just two of them

and here is her simple method for accurate results:-

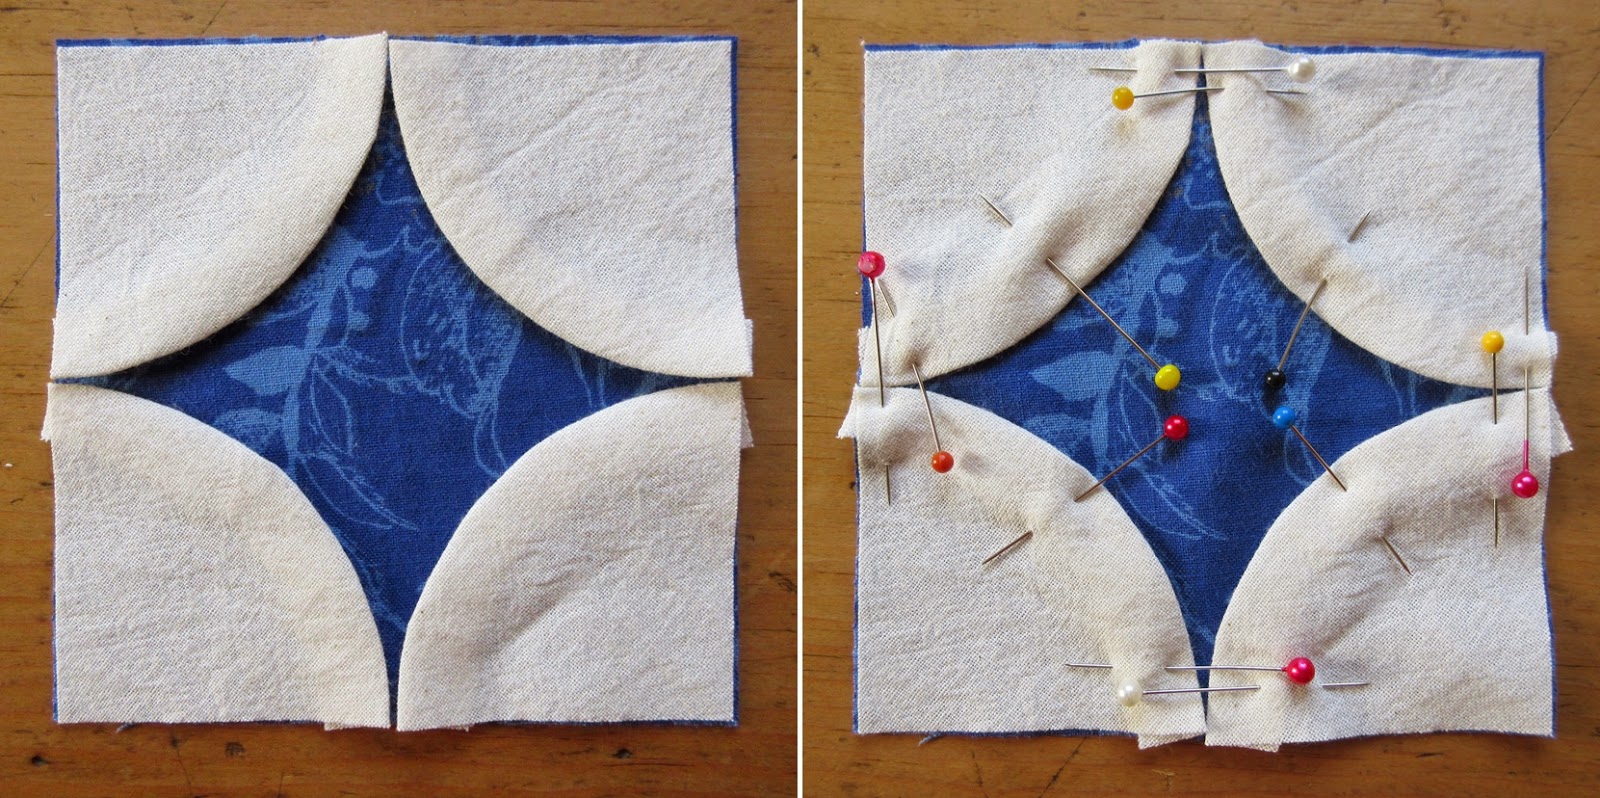
Cut out a circle of cardboard (how handy that plates, bowls, cups, glasses, etc. are all circular and we rarely have to resort to geometry!!) and a square of fabric the same size across

Use the cardboard circle as a template to draw a circle on a different piece of fabric and cut out approx 1/2" larger all around. Tack around the circle outside your drawn line, leaving the end of thread hanging and not finishing off.


Gather up the circle around the cardboard and press with an iron. Remove the cardboard, pull up the thread and press again.

Carefully cut into quarters.

Lay these on your fabric square and pin into place.

Sew on as you would applique and trim excess fabric from the back. Not so difficult after all!

Melody showed us how to finish off our quilts with perfect binding and mitred corners. I think this will have to have a blog post all of it's own - the very next one.

Sue demonstrated rotary cutting and brought along lots of equipment for members to try out.


She stressed the importance of always using a sharp blade - those little snags are so annoying and if you're pressing too hard things are far more likely to go awry. 
I have two cutters the same size. I keep one with a new blade for cutting cottons and put the older blade on the other (marked with a sticky label) for cutting paper and synthetics, etc. I hide the first one from certain people who want to cut all sorts of unsuitable things - they know who they are!!
My other tip would be to never leave your cutting board in the car on a hot sunny day. I am the shamefaced owner of a VERY warped board!


and finally .........

Jane had the super idea that all the members should make a name badge of their own design. There are lots of new members this year and it takes some time to learn everyone's name, especially as there are often 40 of us at the meetings. Jane had lots of colourful felts left over from another project and we could help ourselves to as much of this as we needed. Jane couldn't be at the meeting so I showed everyone some of the badges I had made using Abbie Anne Searle's reverse applique method in her book "Pile & Plunder".

Abbie came to Flowerpatch last June and showed us her exciting wall hangings, etc.

I chose just four 3" square fabrics (the one I put on the bottom is a stiff calico which stops puckering and distortion as you sew) to make my badges and started with quite a simple design.

After another look through Abbie's book I was a little more adventurous.

When I drew my design on the top fabric I laid it on sandpaper to stop it moving about and I used a "Frixion" pen as you can just iron the lines away if you go wrong. I zigzagged over all the drawn lines and then cut away through the layers to reveal the colour beneath.


So quick to do and such fun! There are detailed instructions on reverse applique, and lots of designs and ideas in Abbie's book.

The evening ended with a raffle in aid of the Multiple Sclerosis Society with prizes of vouchers donated by the Launceston Fryers. The delighted winners were Maureen, Della and Shirley.

Our next meeting is on 9th April and is titled "Getting in Touch with your Quilting Style". Members should bring along any or all of the following:- unwanted magazines (not patchwork), paper-cutting scissors and a glue stick.

Thank you for looking - Anita

PS. You can read a full report of our meetings each month in the Cornish & Devon Post.

Friday, 6 March 2015

Simple Blocks Cushion

More simple blocks similar to those in the Strippy Quilt in my last blog post, but this time put together in a much more orderly way. I have made nine blocks each measuring 4" square (+ the seam allowance) and with a 1" border they are just the right size for my cushion.


The three types of pieced blocks are:

                              FOURPATCH           STRIPES        and COURTHOUSE STEPS

I sewed my blocks by machine, then trimmed them to size (4.5") before sewing them together. I made up my quilting sandwich of the blocks, wadding and cheap cotton fabric, and didn't sew on the 1" border (1.5" with the seam allowance) until I had done all the quilting and neatened the edge with zigzag. I think this makes it easier when you come to make up the cushion.
I quilted by machine and chose a leaf design, as the colours looked vaguely autumnal, as well as quilting around each block. I made up the cushion using the same fabric on the back as the small checked green border fabric.

I have written a one page printer-friendly PDF if you would like some instructions on how to make up the blocks by hand or by machine, and have included some tips that you may find helpful.

This is the link

Simple Blocks

Sew happy - Anita

Friday, 27 February 2015

Simple Strippy Quilt

Most of the time I like to keep things simple and this is one of those sewing projects that you can do at your own pace and make whatever size you like. It's stress free! You may not like my colours - I do rather go for "sludgy", but I hope you can imagine it in your own favourite fabrics.


I bought just 5 fat quarters especially


and added others from past projects and from jumble sales - I do love jumble sales. I chose lots of checks and stripes.

The quilt is made up of strips from top to bottom which are, from left to right, 6" wide, 5" wide, 4" wide ........ repeated across the quilt and ending with a 5" wide strip. I did mean all the patches in the strips to be squares, but changed my mind when I couldn't bear to waste some leftover stripey bits.

Many of the 4" and 5" squares are just one fabric, but all the 6" squares are pieced in some manner.

The 4" blocks are stripes, fourpatch and applique


The 5" are fourpatch, ninepatch, stripes and applique


The 6" are ninepatch, stripes and applique


Putting it all together
I made up all the blocks before I sewed any together so that I could add extra fabrics as and when I liked. How exciting when I laid them all out and tried to get the colours and designs balanced across the quilt. I sewed them into their strips and then sewed the strips together. Hurrah! - no seams to match up! As the quilt is a large double bed size, I actually made it up in two halves, put these in their layers with the wadding and backing, and sewed them together after quilting. I quilted by machine along the seams of the strips down the length of the quilt, and by hand between these quilting lines.

Flowerpatch Group Quilt
Flowerpatch Quilters made a quilt in a similar design to raise money for Shelterbox.


I have written a printer-friendly one page PDF with suggestions, if you'd like to design your own similar Strippy Quilt. 
This is the link:

Design a Simple Strippy Quilt

Happy Sewing - Anita

Saturday, 21 February 2015

Penny Armitage at Flowerpatch

I'm Anita. Hello - and welcome to my blog.

I love sewing and in particular all aspects of patchwork and quilting.

I mostly like to do my own thing but, of course, inspired by all the many other patchworkers sharing their ideas online, in books and at workshops. I hope you will like some of the quilts, bags and cushions, etc that I show you in my future blogs and will be encouraged to sew.

I belong to a super patchwork group in Cornwall called Flowerpatch Quilters and will be writing about our meetings each month so let me start with our February meeting.

Our speaker was Penny Armitage and what a wonderful and varied selection of wall hangings she showed us. Her talk was called "From Kuwait to Exmoor  - A Quilter's Journey". Her quilts covered such diverse subjects as Arabian Faces, Torville and Dean, Pearl Diving, Cowslip Workshops, the Wild West of Exmoor and her beloved botanicals, including her favourite - Fuschias. Here are three of her amazing pieces.


Thank you Penny for an entertaining and inspiring evening.

Flowerpatch members were delighted to see that our "St Thomas" quilt appears on the cover of South West Quilters book of the exhibition that was held in Truro Cathedral in Summer 2014.

The exhibition showed quilts by individuals and groups from all over Cornwall and each one represented a different Saint. It will be at Cowslip Workshops over Easter.

The next Flowerpatch meeting will be on 12th March and is a Four Corners evening to include rotary cutting, binding, curved piecing, etc.

Thank you for reading my very first blog! - Anita