Tuesday, 17 November 2020

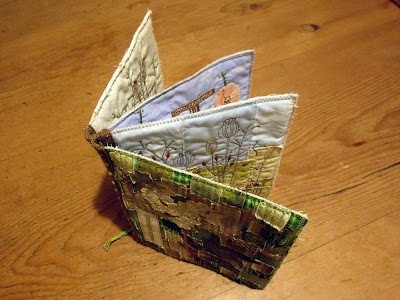
Book of Flowers

 I'm forever trying out new to me things in sewing and I end up with lots of "experiments" which I want to keep, if only for future reference. I decided to turn some of them into a book - a bit like a sketchbook.


One of our challenges at Flowerpatch Quilters this past year has been called "Meadowsweet" so this is my cover.


Inside we have some machine embroidered seed heads


A couple of stitchings over a lino print of the amazing hollyhocks I had growing by my bird table in the summer


A lake scene with yellow flags in the foreground and more seed heads


Finally this is the back which was a fun picture of my back garden that I sewed after getting a new sewing machine - I had so many different stitches to try out!


Every time I make a book I seem to find a different method to put it together. This time I sewed  two of my individual pictures back to back, zig zagging around the edges. This made 4 pages with a design on both sides. Then I sewed two pages next to each other sewing on some tape, front and back, to make a hinge. The same for the other two pages so that I now had two signatures. Finally I stitched through the hinges to join the signatures.


Notice how I have sewn to the side of the centre line so that my book closes easily and the pages meet nicely at the edge. Amazingly it worked a treat and was simple to do.


These are the links to the two other fabric books that I have made:

Love to Stitch book

Seasons Book

Happy Stitching - Anita x


Wednesday, 11 November 2020

Fabric boxes and Invisible zip

I am loving making these simple fabric boxes


 - so much so that I have to tell you about the super tutorial on Tina Craig's "Seaside Stitches" blog. It's written so well. This is the link: Fabric Box Tutorial . I'm sure you'll want to make some too!


I made all mine starting with an 8" square and I sewed the corner triangles at 1.5". They measure 3" x 3" x 2.5" high. This one is linen with wood slice buttons.


Another thing that I have been reading about online is how to put an invisible zip into a cushion and I really wanted to have a go. I already had one side of a cushion cover made. It's a little strange as it was mostly made from some leftover blocks of a quilt, which I cut up and sewed back together again. That's why it was put to one side for some months. By using an invisible zip closure both sides of the cushion can be the front - if you see what I mean, so I set about making another side for my cushion cover.

This is my finished cushion showing the side that I made most recently. I sewed the circle blocks by reverse machine applique using the freezer paper method.


and, do you really want to see the other side? Well here goes


I think the best bit about my cushion is the amazingly good job I made of putting the zip in - it being my first attempt. :)


I followed the brilliant tutorial on Sew Katy Did and followed Katy's advice to go back and re sew closer to the zip teeth. This is the link to the tutorial - Invisible zip

There's always something new to try in sewing - Anita x