My "Red Letter Life" quilt is completed ...... or is it?
This quilt was inspired by two things that happened in the summer. Firstly, Sophie of lunalovequilts blogged about her "Love" quilt. I love everything about this quilt, but especially the abstract lettering in the centre. Secondly, the theme in the upstairs room of our Flowerpatch Quilters exhibition was LOVE so I did my own abstract lettering to make a mini quilt 7½" square. I foundation pieced the letter squares then sewed them together.
By the by I also did another mini quilt for the exhibition using inktense pencils to draw the letters and added quilting and embroidery.
The quilting of Red Letter Life took quite a while. Its vertical wavy lines were sewn by machine with my walking (even feed ) foot.
I avoided all the red letters and quilted these by hand with horizontal lines. I really like the effect of the two types and directions of the quilting.
From the beginning I planned to sew small circles on my quilt to represent the happy bubbly feeling I often get in my life ......... especially when I'm starting a new quilt! I scattered some buttons on the quilt and took a pic ......
......but they simply looked distracting, so I ended up just sewing on some red circles around the edge.
I think though that I may be tempted to add more little circles to my quilt - maybe very subtle ones - we shall see.
Red Letter Life measures 32½" square and I'm hoping that you've been able to read my abstracted words.
Happy Bubbles - Anita x
I'm in the throes of sewing all sorts of things with nothing getting finished! ...... I badly needed the satisfaction of a finish and what better way to achieve this than by making a twinchie for a friend.
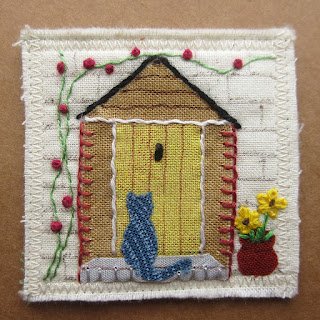
This is a little 2" square picture for my friend who works far too hard at her stressful job.
She has a dear cat called "Blue" who is a delightful companion to come home to ......... and a lovely husband too by all accounts!
I made a bit of a hash of doing a photo method for the making, but here goes:
This is my original rough sketch.
I traced the parts for fabric applique onto Steam a Seam 2, in reverse. This is where it starts to go wrong because I forgot all about the steps in front of the door.
I cut the patterns out roughly, removed the backing paper and hand pressed them onto the correct colour fabric. Still haven't remembered the steps!
This is the ready made twinchie I used - front and back. You can find out how to make a batch of twinchies in this older post of mine.
After removing the other backing from the Steam a Seam 2, I've laid the porch, door ..... and (at last) the steps in position on the twinchie. These can be moved around until you're happy with the arrangement and then ironed for a permanent fix. I used a Micron pen to draw some lines on the door and porch front.
I sewed some of the embroidery before adding the flower tub and the cat.I used just simple embroidery stitches - whipped running stitch, blanket stitch, lazy daisy, straight stitch and french knots.
Here's another look at the finish.
I really don't know why I don't sew more twinchies - such fun.
Happy Stitching
Anita x


