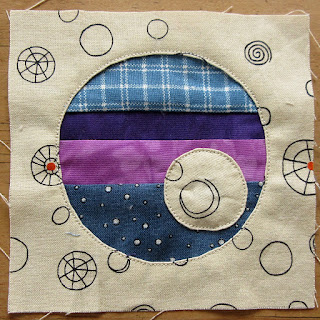
This is design 1 and I intend to add other similar designs in the coming weeks / months. These are still in my head or on scrappy slips of paper at the moment.
There are just two alternating blocks in this first design and each block finishes at 4" + seam allowance. Of course this can easily be scaled up when making something larger.
There are some very good tutorials online about 6 minute circles, but I do like to do my very own mini tutorial.
This is all you need to make the circle block.
- A 4½" square made from strips of fabric - I sew the widest strips on the edges.
- A 4½" square of background fabric - I'll call this background fabric but it's actually in the foreground!
- A 4½" square of freezer paper with a 3" circle cut out
- Sewline or similar fabric glue.
Iron the freezer paper onto the back of the background fabric, then cut out the centre approx ½" inside the paper curve. I fold the background fabric right sides together to do this more easily and neatly as I want to use this centre fabric later on.
Cut slits in the fabric edge almost to the paper edge, then press these tabs over the paper template with an iron.
Put a little fabric glue on the tabs, then place the background fabric on top of the fabric strips matching the outside edges of the block.
Now it's just a matter of sewing around the circle on the background fabric, as close to the edge as possible. I use a short stitch length to help me get around the curve more easily and evenly.
Trim the excess from the strips fabric while the freezer paper is still attached - this avoids accidents with the scissors such as cutting into the background. Then simply remove the freezer paper template.
Now for that piece of fabric that I cut from the centre of the circle. I made a circular cardboard template 1¼" in diameter and drew around this on the back of the fabric piece. Then I hand stitched around outside the marked circle with a small running stitch and gathered it up enclosing the cardboard template. Pressed with an iron, removed the cardboard, gathered up again and pressed again.
This small circle can be placed anywhere within the stripey circle
And here it is sewn in place.
I call the alternate block "floating rectangles" as I hope they look like they are floating on the background fabric next to the circles.
I just used scraps from my stash for this block so my rectangles are all sorts of different sizes, but if you want to use set sizes I suggest that you cut four rectangles which measure 2" x 2", 3" x 2", 3" x 3" and 3" x 2" and a length of background fabric measuring 1" x 10". When you sew up the block you'll find that it comes out larger than the finished 4½" but if you're a wonky sewer like me this is a real advantage as it can be trimmed to shape.
Here are the two blocks side by side.
Here are my 9 blocks pieced together
And here they have been layered up and simply quilted around the circles and rectangles using my walking foot on my sewing macine.
Finally I decided to free motion quilt on the background fabric with varyingly spaced vertical...ish straight.....ish lines to really make the shapes pop and I bound my mini quilt with some of the fabrics already used in the design.
I haven't thought of a good name for my design yet ....... possibly "see-through circles"?
I'm linking up with Crazy Mom Quilts - Finish it up Friday
Happy Sewing
Anita x


Circle Play! You make it look so easy.
ReplyDeleteOhhhh, light bulb goes off, so THAT is how you make circles. This opens a whole new world of possibilities.
ReplyDelete